How to create a table lamp step by step
Do you want to add a personal touch to your home lighting? Making a table lamp is a creative, cost-effective, and highly rewarding way to do so. Not only will you be decorating, but you'll also be building a functional object with your own hands. In this guide, we explain how to create a table lamp step by step, what materials and lighting accessories you need, and some tips to ensure the result is safe and professional. Check out all our accessories for creating lamps.
Why make your own lamp
Assembling a table lamp is not just about aesthetics. It's a DIY project that allows you to tailor the design, size, and type of light to your needs. You can repurpose objects you like—a bottle, a wooden base, a tripod, or a decorative figure—and turn them into a unique lamp. Additionally, creating it yourself will help you understand how a basic electrical installation works, which is always useful for future repairs or projects.
Materials needed to create a table lamp
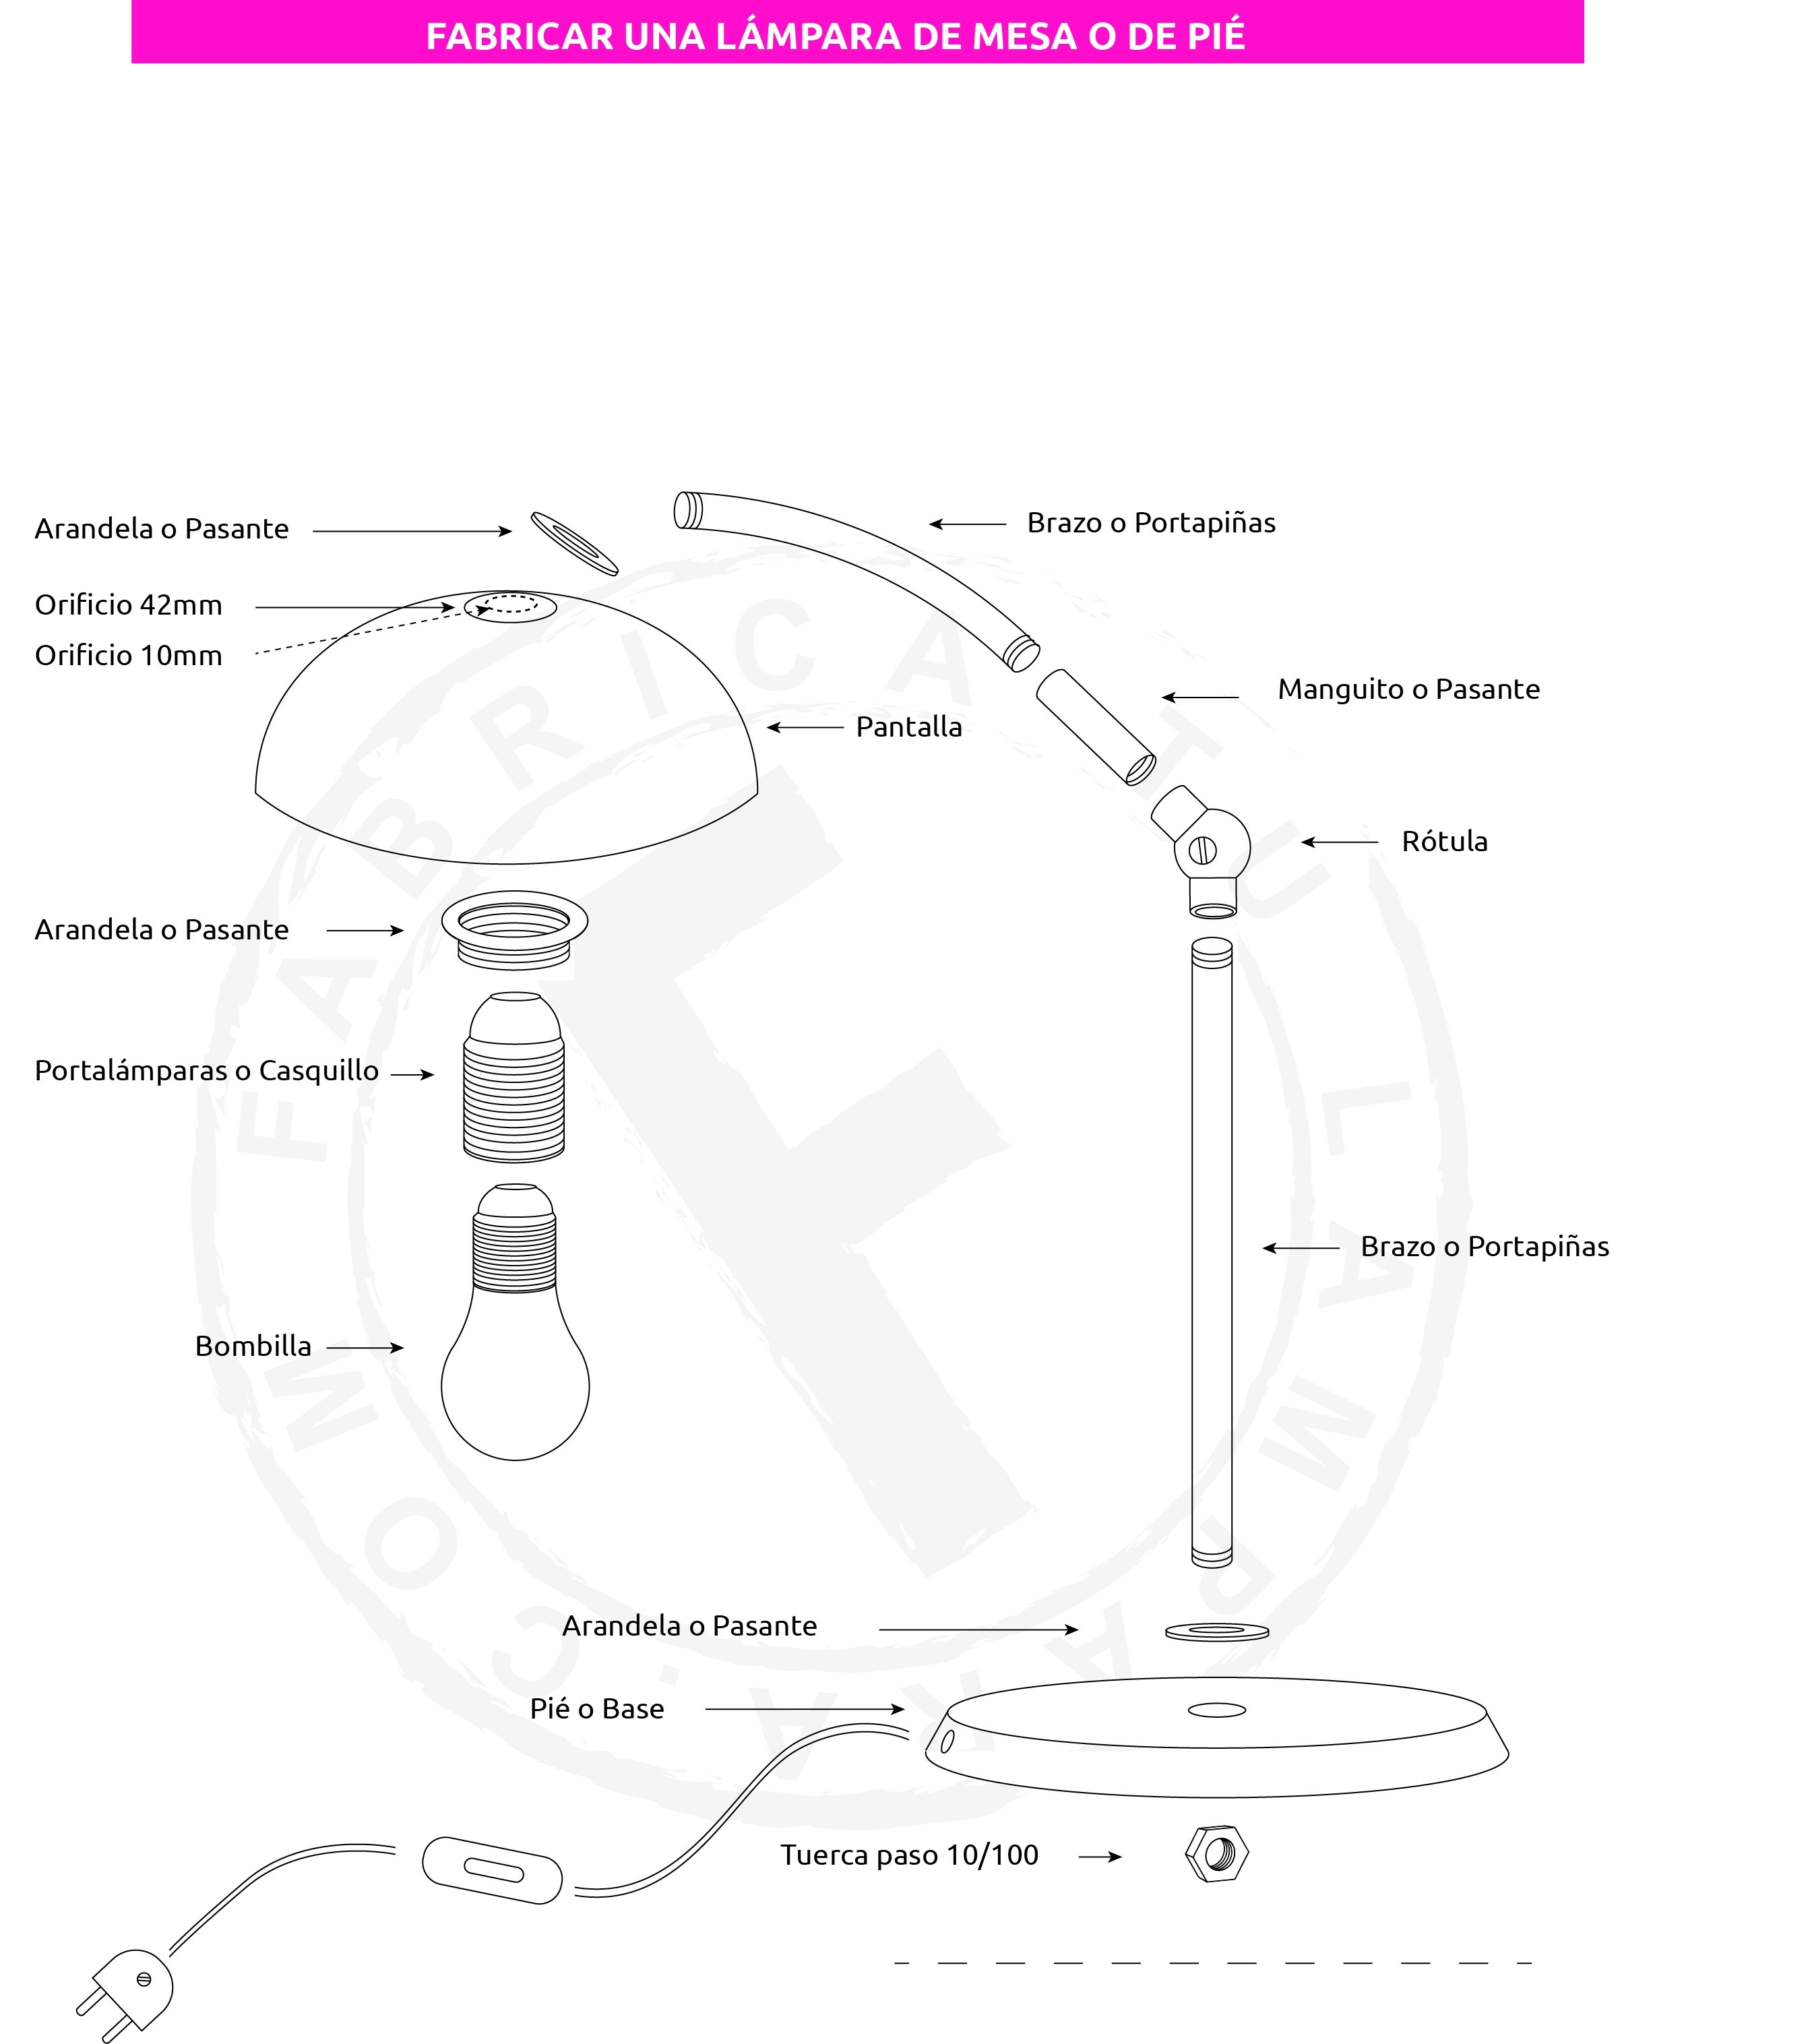
Before starting, gather all the elements you will need. At LightingDIY.com, you will find all the lighting accessories mentioned below:
- Base or stand: It can be made of wood, metal, ceramic, or glass. It is the structure that supports the rest of the lamp.
- Rod or threaded tube: Connects the base with the lamp holder. There are extenders, rods, and threaded bars in various sizes.
- Lamp holder: Also known as a bulb holder. The most common types are E27 and E14. You can choose them with or without a switch, with a screw or clip for the lampshade.
- Decorative textile cable: Adds an aesthetic and professional touch. They come in braided or smooth finishes, in multiple colours.
- Switch and plug: For conveniently turning the lamp on and off and connecting it to the mains.
- Connection block: Used to join the cable coming from the plug with the one from the lamp holder.
- Lampshade or diffuser: Defines the final aesthetic of the lamp and the type of light (diffuse, direct, or warm).
- Decorative bulb: LED filament bulbs are favourites for this type of project due to their low consumption and retro style.
Step by step: how to assemble a table lamp
1. Prepare the base
The first step is to have a stable base with a hole in the centre to pass the rod or tube through. If it doesn't have a hole, you can make one with a drill bit suitable for the material. It's important that the base is firm: the weight of the lamp will depend on it.
2. Insert the rod or extender
Insert the threaded rod through the hole in the base. At the bottom, secure it with a locking nut or threaded female to fix it in place. If the base is irregular or hollow (like a bottle), use a rubber or metal pass-through to stabilise it.
3. Assemble the lamp holder
Place the lamp holder at the top end of the rod. There are models with a screw to hold the lampshade or with a clip for glass diffusers. Before closing it, thread the textile cable through the inside of the rod, from the base upwards.
4. Make the electrical connections
Inside the lamp holder, you will find two small screws or terminals. Connect the two wires of the cable (live and neutral) to them. At the bottom end, join these same cables with the cable that has the plug using a connection block. If the cable includes a switch, ensure the cable cut is on the live wire.
Tip: If you have no experience with electricity, always consult a professional or check that the cables are properly stripped and secured to avoid loose connections.
5. Attach the lampshade or tulip
Once the electrical connection is complete, you can attach the lampshade or tulip. If it's a decorative lamp, choose a fabric or perforated metal lampshade. For a more direct light, opt for a clear glass tulip.
6. Add the bulb
Screw in an LED bulb in your preferred tone: warm (2700K) for cosy environments, neutral (4000K) for workspaces, or cool (6000K) if you want a more intense white light. Remember, the bulb is the final touch that will define your lamp's style.
Safety and style tips
- Don't improvise with wiring. Always use CE-certified cables and lamp holders.
- Check the stability of the base. If the lamp is tall, add weight to the bottom.
- Play with the colour of the textile cable. A red or gold cable can transform a simple lamp into a statement piece.
- Mix materials. Wood with brass, ceramic with fabric, or glass with metal: mixing adds personality and modernity.
Common mistakes when assembling a table lamp
A common mistake is not leaving enough cable inside the base, which makes assembly difficult. Another is choosing a lampshade that's too large for a small base, which visually unbalances the set. It's also advisable to avoid using thin or non-approved cables: they could heat up or become damaged over time.
Get inspired and customise your design
The possibilities are endless. You can create a table lamp with a glass bottle, a lamp with a natural wood base, or a lamp with an industrial metal tube. The important thing is that it reflects your style. Add a linen lampshade, a vintage bulb, or a bold coloured cable: every detail counts.
Now you know how to create a table lamp step by step. With the right accessories and a bit of patience, you can design a unique piece, made by you and fully customised. At LightingDIY.com, you'll find all the materials you need to make it a reality: lamp holders, textile cables, lampshades, tulips, bases, and strips. Light up your creativity!